My recent adventures led me to leave North Carolina to move to Boston with my husband… well for the half of the year when I won’t be in France working on Deer&Doe’s many projects, that is! The consequences of that move were quickly noticeable: no more of this stifling carolinian heat, Boston is COLD. As soon as I arrived, I instantly felt the need for a warm, cosy, flannel shirt.
This shirt reminds me of Boston in every way: I bought the pattern when I visited the city for the first time ever, at Grey’s Fabric and Notions back when the store still existed. Two years later, I bought the buttons to finish it at Mercer’s Fabric, the store that replaced it, when I moved here for good. I suppose the fabric is not really from Boston, but I bought it at Hancock Fabrics and umm… I guess John Hancock was from Boston, right? Okay well nevermind. Anyway now that I’m back in France for a few months and I’m struggling to adjust to my new temporary life, I am glad to have this comfy shirt to remind me where home is.
I already have a few tried-and-true button-up patterns: the Deer&Doe Bruyère, which I’ve already made for myself in shirting cotton, flannel and as a crop top, and the Mélilot which I made four times counting the ones I made for the online store. I also have in my stash this lovely retro Burdastyle number, which I’ve made for my grandma years ago and I’m looking forward to sewing again. But for this shirt, I thought I could use a change and I looked for simpler, straighter style. So I ended up picking the same pattern as the entire sewing blogosphere: the Archer shirt from Grainline Studio.
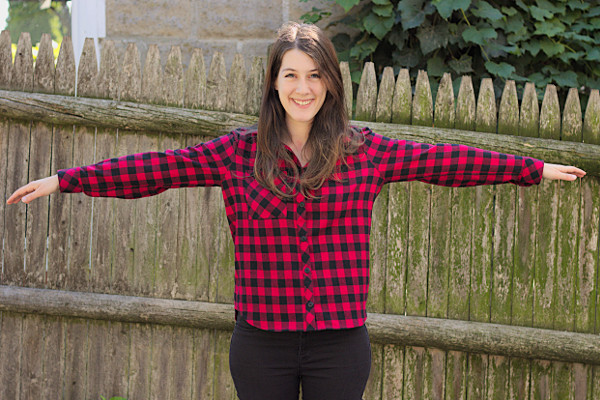
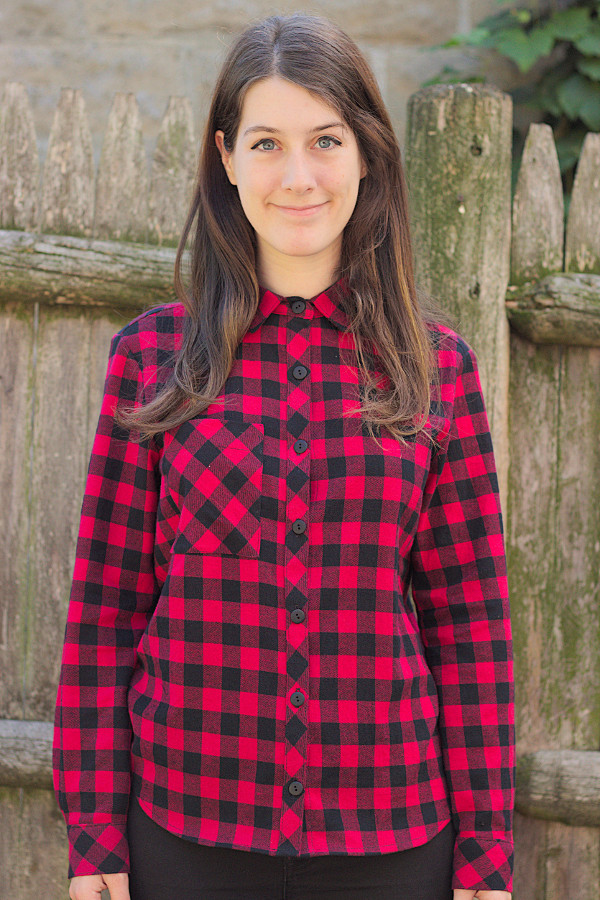
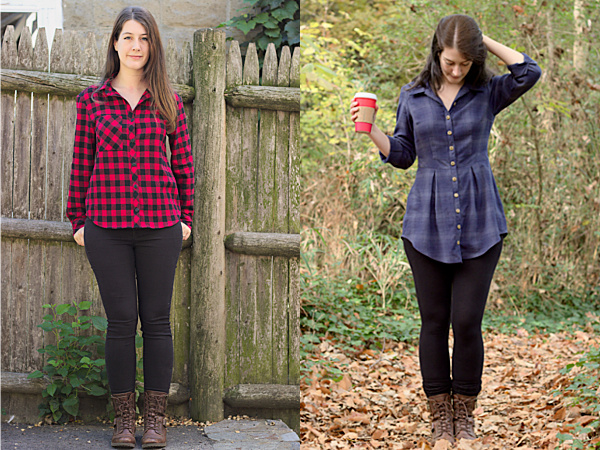
Unlike Bruyère or Mélilot, Archer has no bust darts. The fit is thus much boxier, which for a casual flannel shirt is not necessarily a bad thing. The sides are very slightly curved in, but overall it pretty much hangs straight from the bust. Since it was my first time sewing a Grainline pattern, I just went with my bust measurement and sewed a straight size 8 without any adjustments. The fit is very loose, maybe a bit too much? The shoulders are a little dropped and I’m not sure if that’s the way it’s supposed to fit or not.
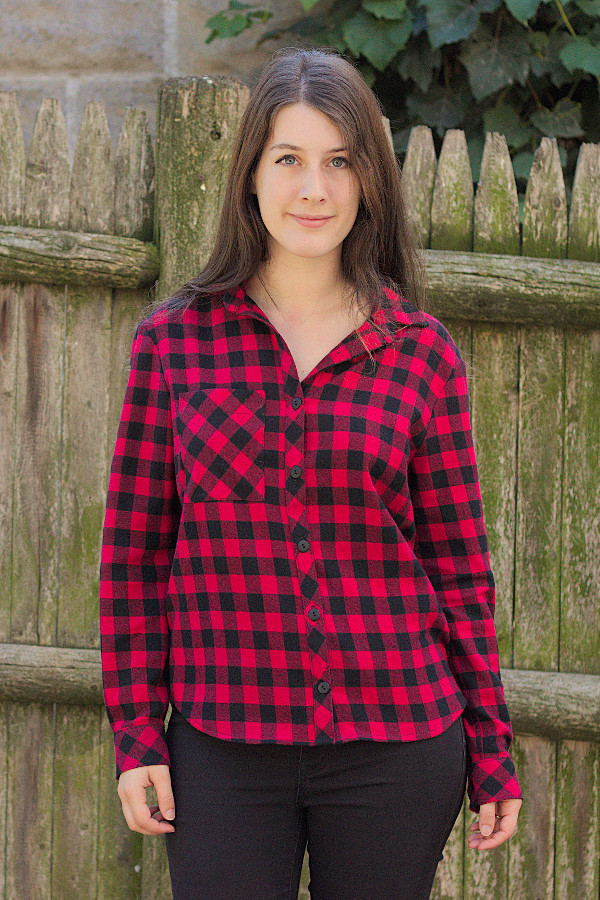
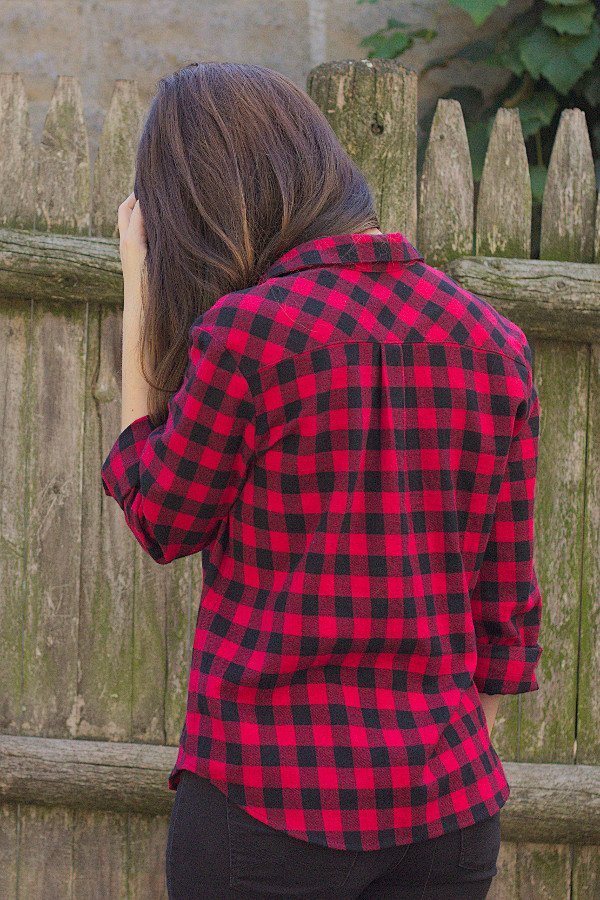
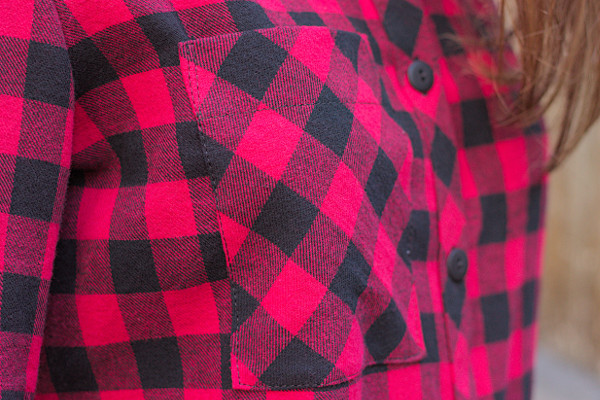
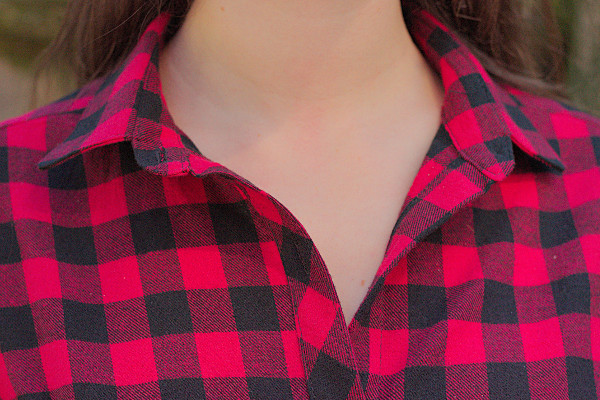
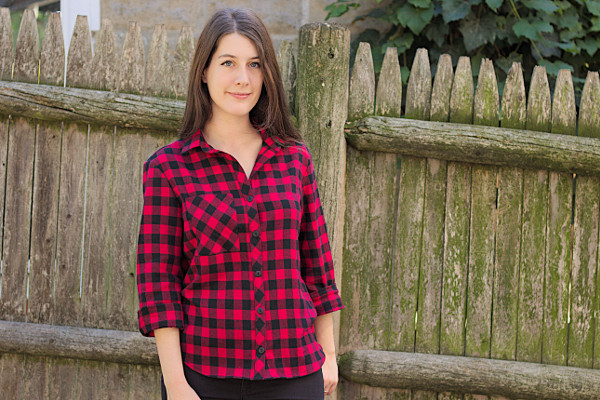
I had a blast matching the plaid on the sides and front of the shirt, as well as the back of the collar and collar stand. My trick for plaid matching is to cut everything as a single layer, especially with flannel since it stretches out of shape so easily. Before cutting each piece, I take the time to straighten out the fabric so that the vertical and horizontal lines are perfectly perpendicular everywhere. When I need to cut two of one pattern piece, I lay down the first one face down on the fabric and match carefully every stripe along the edges, to make sure that the two are perfectly symmetrical. Obviously the whole process takes forever, but I think it’s worth it.
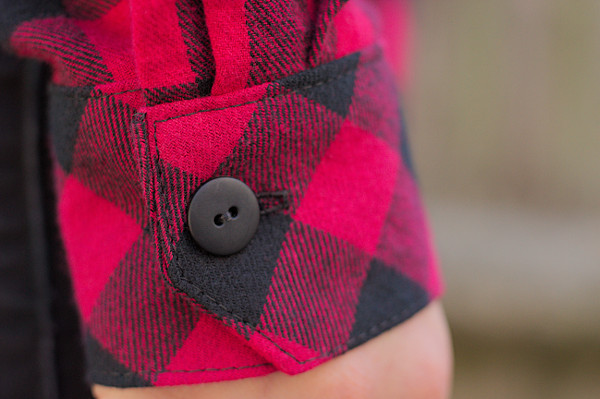
I also cut the back yoke, button band, sleeve cuffs and pocket in the bias (I only added one pocket because the shirt seemed busy enough with one). With this fabric there was an extra difficulty level: the horizontal and vertical stripes are not exactly the same width. If you look closely at the pictures, you can see that the black rectangles are slightly taller than they are wide. For the bias-cut pieces, I was careful to cut everything “in the same bias”: for instance on the pocket and button band, the rectangles’ height is on the top-right/bottom-left diagonal. There is just that left sleeve cuff (on the right on the picture) that is cut in the other direction because I tried to have the two cuffs be symmetrical, but now looking at the pictures I regret doing that because it looks unintentional. Yes yes, I know I am the only one to notice these things 😉
Back to the pattern: the instructions are very, very detailed. With the sew-along on the blog, it’s definitely accessible to shirt-newbies. Careful though if you are used to patterns with seam allowances included: here they are only 1/2″ instead of the 5/8″ used by most of the indies and Big 4 patterns. I also liked that the booklet includes a cutting layout for interfacing (that’s rare!) even though there were a couple errors: there’s actually no label indicating it is indeed the interfacing cutting layout, and more importantly the figure shows the fabric folded in two when the layout should be on a single layer.
Construction-wise, I loved the infamous “burrito” method for assembling the yoke, which is not actually explained in the booklet but is shown on video in the sew-along. However, I HATED the instructions to finish the collar! It was my first time seeing a collar-stand finished this way: the ends are turned to the wrong side and stitched together, with the button band in the middle – hard to explain in text but pretty clear on video. Counting the button band and all the seam allowances, I ended up with seven layers of fabric, plus two of interfacing, all rolled up in a tiny sausage next to the stitching line: hard to achieve a neat result in these conditions!! Even the shirt from the sew-along has tiny folds on the pictures, where the button band meets the collar stand on the outside edges. After trying a few times I gave up, folded the inside collar’s seam allowances on the inside and finished by hand. I don’t know why anyone would want to struggle trying to do this by machine just to save a couple inches of hand-sewing, especially when the rest of the collar stand has to be hand-sewn, and then topstitched!
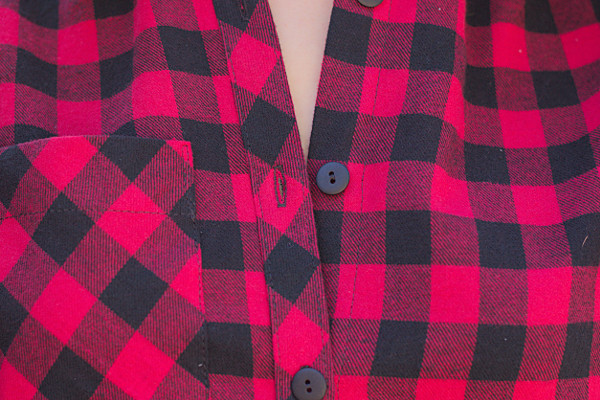
Another detail I’m not a fan of, but this one is just my personal taste, is the asymmetrical button bands: the one on the right is a button placket, and on the left is just folded a couple times. I know it’s a classic detail, and I’ve seen it on many RTW shirts, but even though it is pretty when the shirt is buttoned all the way I don’t like it when it’s worn open. With the button placket cut on the bias, I think the shirt looks very unbalanced when the buttons are undone.
That said other than the collar the pattern was a breeze to put together. I didn’t even have to ease the sleeves in: a few pins were enough. I just had an issue with the sleeve cuffs that ended up slightly too big for the sleeves. After going back to measure the pieces on the pattern, I kinda feel like they would have been the right width if I hadn’t folded the front sleeve placket under as instructed. I didn’t see this mentioned anywhere online so the issue probably comes from me… Anyway the shape of the cuffs is pretty cool!
Okay, one last thing I’m not happy about: button placement! When I was about to sew the buttonholes I had a sudden doubt, and I thought about shifting everything slightly so I would have a button on the same line as the bust apex. I decided to stick with the pattern and do the buttonholes following the markings. Bad idea! Of course, since there is no button at apex level, the shirt gapes between the two buttons at the bust, and sometimes it gapes a lot. I also think it would have been more flattering if the second button was lower, or the third button higher, making the neckline a bit deeper when the upper buttons are undone. As is, it’s an in-between I feel very “meh” about.
Looking at the pictures of the finished shirt I’m not sure what to think of it. It’s clearly not the most flattering shirt I own, compared to more fitted one like Bruyère for instance. Part of it is my own issues with the fit: the shirt is a bit too short for me, and I could probably size down at the shoulders, and move the buttons so that the neckline is more flattering. Part of it is just the pattern itself: with no bust darts, almost straight side seams, and wide sleeves, it’s hard to compare this shirt with patterns that have less wearing ease.
When I think about it, the clothes I wear the most are not necessarily the most flattering, but instead the most comfortable. Maybe I’ll wear this shirt a lot: it’s very cosy and soft so I’m going to like snuggling in it this winter. However I might wear it open on top of a black t-shirt, and not buttoned like on the pictures.
I had more fabric set aside for a second Archer, but I’m going to wait to see if I wear this one to decide if I’m going with Archer again or if I’m switching to a more fitted pattern. The fabric I have is a great cotton flannel with green and purple plaid, also bought from Grey’s Fabric and Notions a while ago. Actually I have a question regarding this fabric: it’s brushed on one side only, which means I have one side that is soft and fluffy and another one less soft and looking like shirting cotton. What side would you use as the outside? I’d like to keep the soft side against my skin but I feel like it might not look like a true flannel shirt anymore…
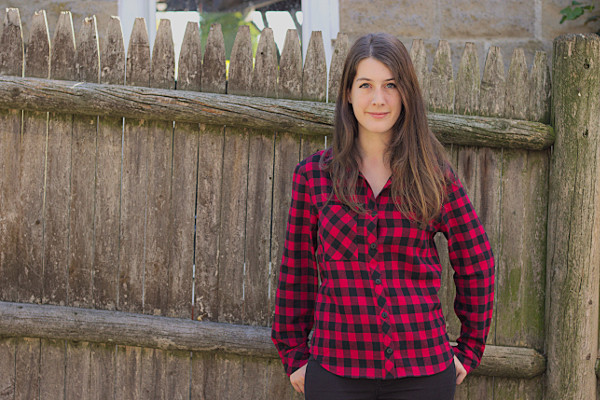
Boston Shirt
Archer – Grainline Studio
Size 8
Buffalo Plaid cotton flannel from Hancock Fabrics


I actually rather love the look of your new shirt! Not the most form fitting, but as you said it – super cozy and perfect for upcoming cold months. I hope you’ll get a lot of wear out of it! If you’re interested in similar look but with a bit of shaping take a look at a Burda 09/2009 #105, if you by any chance have that number. I made one and I love it, although I did forgot to grade one size up across the hips so now I have to wear it with last button open 😀
Thanks for the tip! Unfortunately I have the 08/2009 but not the 09/2009, whyyyyyy… Also I am so happy you left me a comment because I discovered your IG account and completely fell in love with all your makes from Burda patterns!! This is super inspiring 😀
I think your Archer shirt is beautiful. It looks like a high-quality RTW shirt. Probably, you got used to more fitted garments, and therefore think this shirt is not flattering. But the shirt does look flattering, cozy and well-made!
Thanks a lot Tatiana! I tend to be pretty critical of my projects, I’m not sure why, but you’re right this shirt is actually pretty good, and it is really cozy!! 🙂
You made a beautiful shirt: it looks great and super cozy! You definitely did a wonderful job on the sewing, as everything looks impeccable. I can sympathize with feeling like this shape isn’t flattering; however, I think for flannel shirts it can be nice to have the option of something looser to wear open (or partially unbuttoned) over other less seasonally-appropriate tops.
I am 100% with you on the button band thing: I just finished my 2nd Archer and forgot that, after my first one, I meant to go back and make both bands sew-on. >=( Hopefully on the third try I will remember, LOL. Re: the collar, try the construction order over at the blog Four Square Walls–it makes the process much easier and no hand sewing is needed! It’s my go-to order for a collar and stand assembly. =)
I’ll try it next time! It’s very different from what I’m used to so I’m intrigued 🙂
A flannel plaid archer seems like a great wardeobw addition to me!! Lovely. Now that I read about your issue with the cuffs, I had the same problem last time (made size 2). Its been awhile but i remember i played with the pleats in order to accommodate the cuffs. I definitely make some more Archers so it is a good reminder to get this straight before cutting! Thank you for your detailed posts, really helpful!
You’re welcome, I’m glad you enjoy them! I’m happy to hear I wasn’t the only one having this problem with the cuffs!
Lovely make Camille, your natching is superb – totally get you re the button band…. folded both sides or placket both sides please!
If you can get yourself to inore the button bands, perhaps try it open over a little black fitted polo neck – European polo neck – I think it’s turtle neck in the States? Un col roule’ anyway. A little bit 60s beatnik and cosy at the same time – with black safran like you’re wearing -‘i can just see it. And a black beret….. sorry, I’m a stylist at heart:).
I don’t have any Grainline patterns – too post grunge for my vintage-inspired style.
I’m starting to think we have very similar styles 😉 I’m totally with you on the turtleneck! I have had my eyes on the Rise and Fall pattern from Papercut, not the first version with the dropped shoulders but the second one, which is more fitted. It reminds me of the one Audrey Hepburn wears during the dance scene in Funny Face – love it!
This looks so nice and so professionally sewn! I remember reading somewhere in the Grainline blog that it’s intended to have a slightly dropped shoulder… it’s a “boyfriend” fit. I think it looks really good on you, but like some others have said, it’s probably just a different fit than you’re used to. My Archers fit me almost exactly the same as the RTW buttondowns I used to buy from Uniqlo before I could sew them myself.
I didn’t realize you were in Boston part of the time! If you’re ever in NYC let me know! 🙂
That’s good to know about the shoulders fit! I’ve been wearing it non-stop since I’ve made it too be honest so I really got used to the fit 🙂
And yes! I’m hoping I can go down to NYC sometime next year, I will definitely let you know 😀
Yup, I think so too:). I have the Rise and Fall pattern – bought it for the fitted version of course 🙂 and for the same reason! I plan to make it soonish – will post it on Instagram when it’s ready with comments:).
Perhaps try lengthening your next Archer by a couple inches. You are not saying that you pulling or tugging at it. So it may just be just a visual appearances are not what you were expecting or like. We know you like the Bruyere but what if the Archer matched that length. I wonder if you would like it better?
Yes, I think one inch would make a big difference! The Bruyère length would be too much though as the curved hem is almost mid-thigh in the front.
[…] September to February it’s time for plaid flannel! By the way, have you ever noticed that buffalo plaid is basically gingham‘s evil twin? White buffalo plaid or black gingham, it might be the most […]