A bit latter than I was aiming for, here is finally the third and last part of my Trello series! After talking about keeping track of the fabric stash and planning and setting deadlines for sewing projects, let’s get into how to use Trello to organize a sewing-pattern stash! Paper patterns, magazines, and pdfs all in the same place, and we’ll find out how to use labels, attachments and the search function 🙂
Getting an overview of one’s pattern collection
The first advantage to recording info on all your patterns in the same place, is that it allows you to get an overview of your collection. I don’t know about you but between my shoe-boxes filled with paper patterns, my shelves of books and indie patterns, my boxes of sewing magazines and my external hard drive full of pdf patterns, it happened more than once that I purchased a new pattern only to realize I already had an almost identical one.
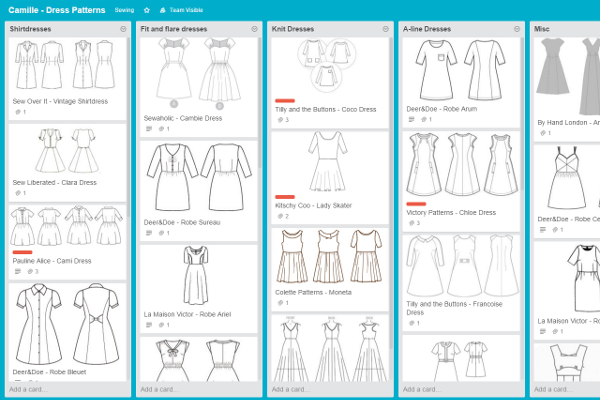
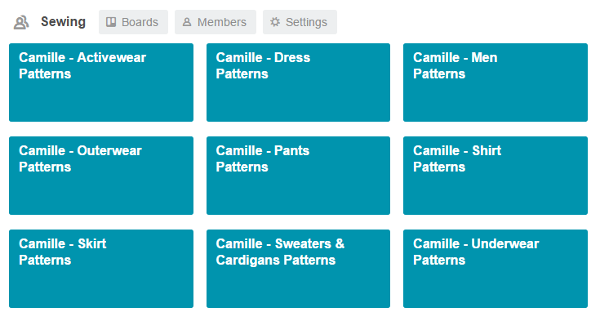
Instead of organizing my patterns by type (paper, pdf…), brand, or required yardage, I organize them by garment types and styles, which allows me to spot more easily if I have several patterns that look alike. Because I have a lot of them, I had to split them into several boards:
Each board contains several lists, which corresponds to types or styles of garments. To each their own classification scheme, I think it doesn’t matter much if there is a little overlap between categories as long as they are easy to navigate and there is a good balance between too many and too few patterns per list. For now, I use the following categories:
• Dresses: Shirtdresses / Fit-and-flare / A-line / Vintage reproductions / Misc.
• Skirts: Pencil skirts / Pleated skirts / Flared and circle skirts / Maxi skirts / Misc.
• Pants: Trousers / Shorts / Jeans
• Shirts: Button-down / T-shirts / Blouses / Sleeveless tops
• Sweaters and Cardigans: Sweaters / Cardigans / Shrugs
• Outerwear: Jackets and blazers / Coats / Trenchs and unlined coats
• Underwear: Bras / Panties / Pyjamas / Swimsuits
• Activewear: Tops / Bottoms
• Menswear: T-shirts and shirts / Pants / Sweaters and cardigans / Coats / Underwear
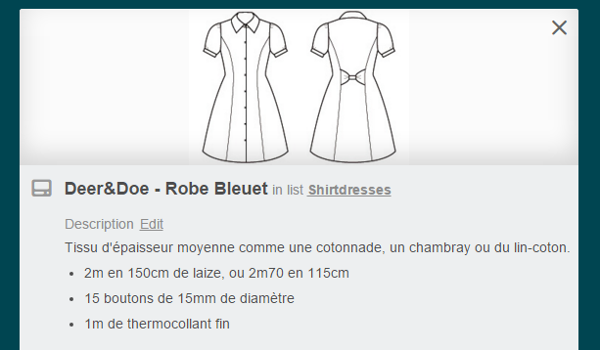
In these lists I place one card per pattern, to which I attach its technical drawing, which allows me to understand more easily the lines of the garment than using fashion drawings or pictures, so I can compare between brands. In the case where a single patterns contains several garments (for instance, Vogue V8875 has both a dress and a coat) then I put cards in each corresponding board, with only the relevant technical drawing.
Finding pattern details and information
The second advantage to having all of one’s patterns on Trello is that this information is then available anywhere. No more scribbling yardage and notions on scraps of paper before a trip to the fabric store, or struggling to find it on a phone screen while in line at Jo-Ann’s! In addition to the pattern references, I write in each card’s description the recommended fabric type, yardage and notions.
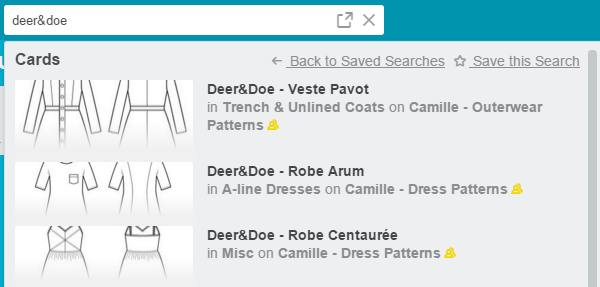
Another useful habit is to add some keywords: deer&doe, dress, buttons, buttonholes, bow, collar, princess seams… The goal here is to be able to use Trello’s search functionality to find patterns with these keywords. So by searching for “deer&doe” for instance, I can find all of my patterns from the brand, no matter which board they belong to. Similarly if I search for “Burda 01/2011”, I’ll find all the patterns of this issue that I indexed.
Storing pdf patterns
The last point I wanted to talk about is the possibility of using Trello directly to store pdf patterns! In addition to line drawings, you can also attach pdf files to the cards: Trello accepts files up to 10Mb, which is usually enough for pattern and instruction files. If your file happens to be over the limit, you might still be able to compress it (using online tools such as smallpdf) so it goes back under 10 megs.
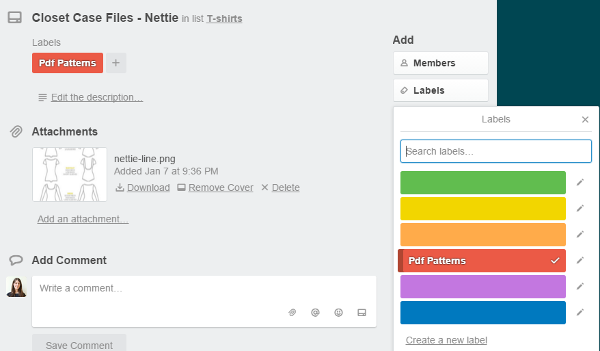
When I add a pdf pattern, I also add to the card a label that identifies it as such (these are the red marks on my screenshots). When you create a board, the labels are just different colors, without added meaning. If you want to name them, you need to go to the board’s options: More > Labels, and then click on the color to add a textual label. Here I named it “Pdf Patterns”. Note that labels are board-specific, so you’ll need to do the same manipulation on each of your boards.
To add a label to a card, all you need to do is click on the Labels menu and select one or more:
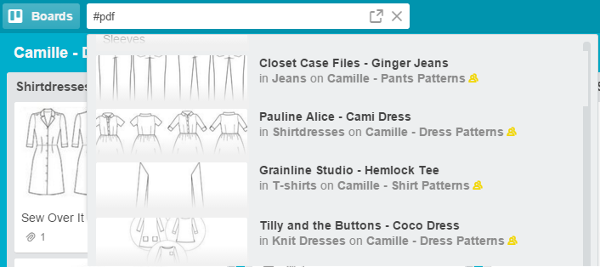
Once you tagged your pdf patterns with the corresponding label, you can use the search function to find all of them. To search by label, you can use the label: keyword, or simply the # character. To find all my file, I just have to write “#pdf”:
That’s it for my use of Trello! I know that a lot of you have started using it as well, so if you have advice or ideas on how to improve the use of Trello for all kind of craft-related purposes, please feel free to share in the comments 🙂
Part 1: Keeping track of the fabric stash
Part 2: Planning and deadlines



This is so useful, thank you very much for going into so much detail. I’m definitely going to start using this system, it sounds perfect! x
I am really glad it is useful! 😀
[…] has wrapped up her using Trello to organize your sewing projects series. I have been using Trello since her initial recommendation and I love it! […]
Hello! This is a great post, and has encouraged me to start using trello – I have a couple of questions, if you have time – it looks like you have an entire sewing section with boards? Is that right, and if so, how did you do it? Also, how did you get the line drawings for the pictures? I think this is something that is probably obvious, but I’m having a hard time figuring it out. Again, thanks for the tut, I really appreciate the work that goes into these things!
Yep that’s right! I have so many boards that I create “teams” to organize them in groups. You can add boards to a team, it’s normally something you would use to share boards with a group of people but it also works for grouping them to use by yourself. You can make one by clicking on the top right corner on the + sign and selecting “Create a personal team” (that’s for the web browser interface)
And for the line drawings, I usually get them on the pattern companies website and then I edit them using Gimp (free photoshop equivalent) because I’m a bit obsessive ^^
Hey, that’s really nice! I would like to adapt it but I’m afraid, that it doesn’t work for all patterns I have. Can you tell me how many patterns you have?
I’ve never even counted them! As an example, I currently have 115 patterns on my “Dresses” board, and that’s just for the dresses that I entered. I also have at least three years worth of Burda magazines, with at least 20 patterns per magazine that should be something like… more than 720 patterns? I guess I’m far from being done with the whole ordeal ^^’
Genius!
C’est exactement le type d’organisation que je cherchais ! J’étais prête à développer ma propre webapp tellement je désespérais de trouver un moyen facile/pratique d’organiser/trier/filtrer/chercher ma patronthèque !
Merci, merci et encore un grand merci pour la route !
De rien ! Je suis vraiment ravie que ça serve 🙂
Oh my! I just last week added all of my patterns to Pinterest with the pdfs in Dropbox and am already despairing that there was no sort of organisation.
This.changes.everything!!!
This is so useful, Mallory was talking about it on the Self Sewn Wardrobe, I downloaded it but was then a bit stuck as to how to use it. This is brilliant, thank you.
I am so happy this was useful!
[…] named Attack of the Seam Ripper has a series of 3 tutorials on using it to organise fabric stash, project deadlines and pattern stash.) I shall have to systematically tackle what I have on hand […]
Thank you SO, SO much for this. It completely changes my organisation. I’ve dived in, I had trellis already but didn’t really understand all its features yet and I kept putting off working with it. I’m now using all your tips, not only in sewing but ALL of my boards. I came to thank you and pay it forward: because I have figured out a way to transfer labels between boards. Create a card with all labels assigned, and move it to a new board. This could very well just be an empty card, solely for moving around. The empty labels will apoear,as well of course, but i didn’t mind that. Again, thank you so much, not only for these three posts, but also for your very inspirational blog.
Thanks for the tip Anne this is going to be super useful to me! I am really glad these posts were useful, I hope you enjoy Trello as much as I do 🙂